
Model No: MOD-00120
TK. 190.05
Quantity:
Category: Power Supply
Supplier: Techshop Bangladesh
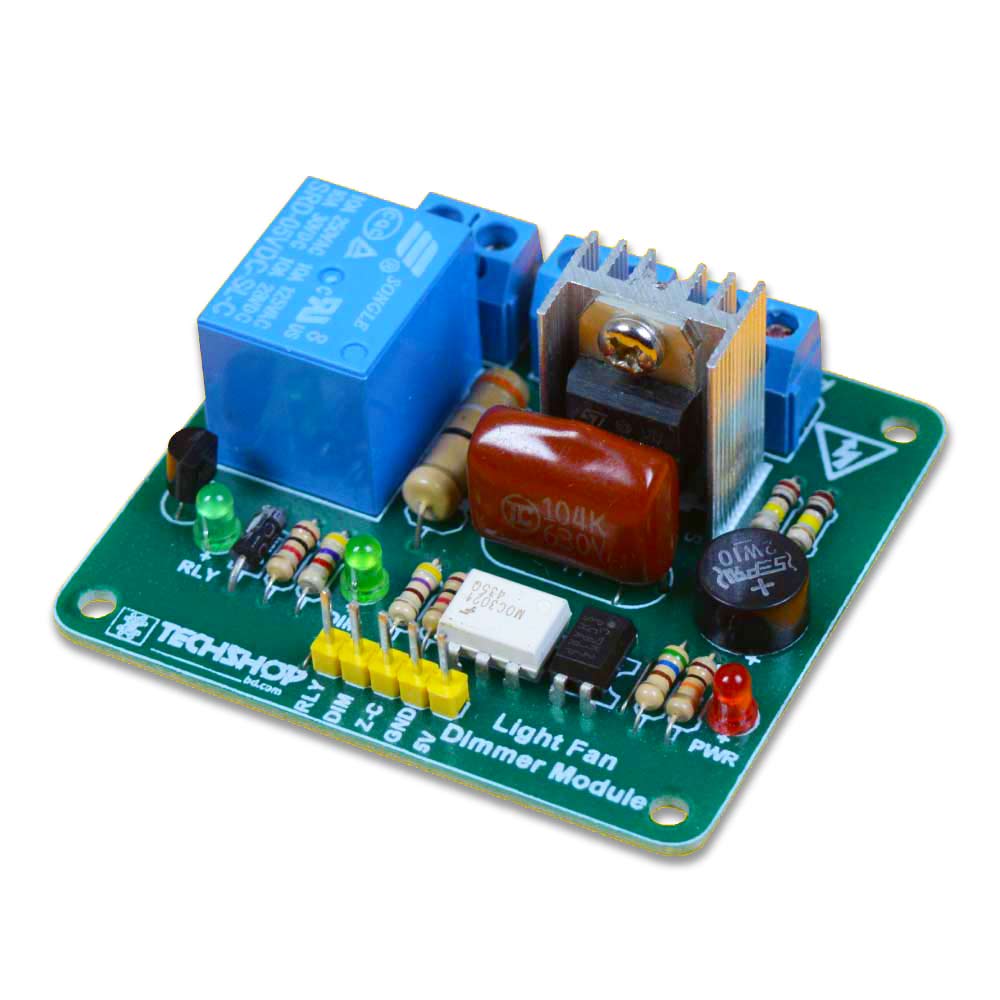
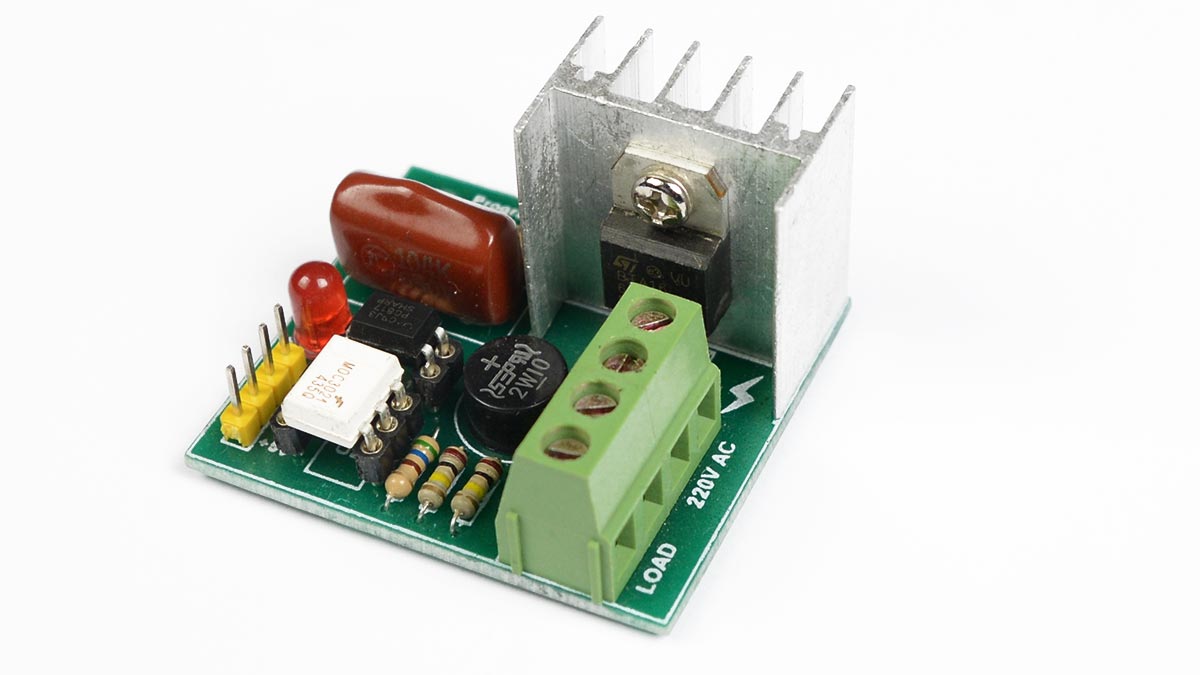
This is an Arduino compatible AC voltage dimmer. Microcontrollers also can be used instead of Arduino. With this dimmer, you can control the speed of AC fan & brightness of light (only incandescent light). Check out the example code given in the documents section to understand its use.
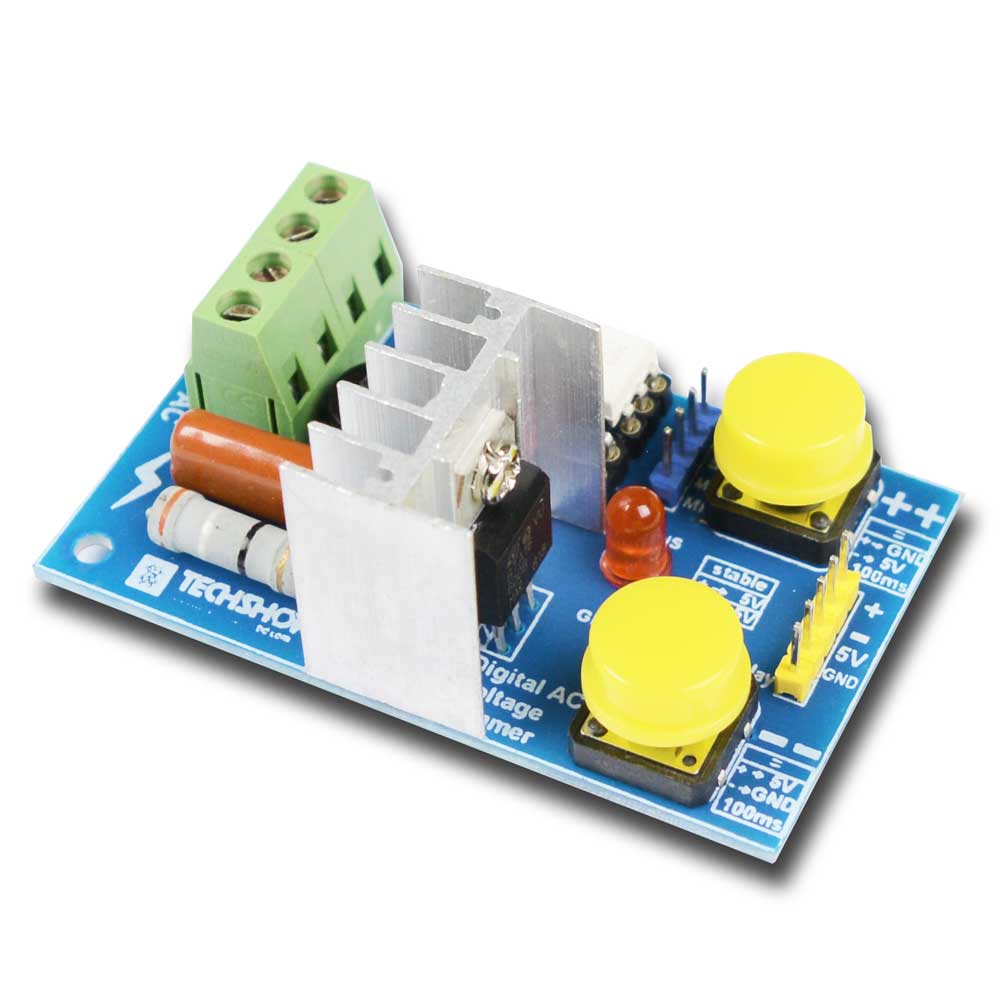
This module cannot be used with energy saving bulbs, only incandescent bulbs. This module is very hard to control with Raspberry Pi, you need to know interrupt handling and timer ISR. It would be better if you could use this one:
This module has a built-in microcontroller under it and takes care of Interrupts, Timer ISR etc. You just have to give 0V and 5V 100ms pulses to +/- pins to increase or decrease load voltage.
NB: This device does NOT support tube, fluorescent or energy saving bulbs.
Related To This Item
Question & Answer
Total 31 questions
Q: will it be possible to control ac fan too? Is heat sink required with this module? Questioned by pronabsaha137, 24-Oct-2016
You can. Heat sink is not needed for fan-light. For bigger loads it may need. Answered by A.R, 25-Oct-2016 11:19 AM
Q: please create a Ir remote control arduino program for this. I really need this... Questioned by mahfuzdot, 17-Nov-2016
Q: Please make a remote control sketch for this module... Questioned by mahfuzdot, 17-Nov-2016
Hello, sorry it's not possible for us to give code on demand. We give one sample code so that people get the idea and do projects by themselves. Answered by A.R, 17-Nov-2016 14:45 PM
Q: It's not demand just a request.... Questioned by mahfuzdot, 17-Nov-2016
Q: I buy 2pice of this module an I am stuck please create a code for me... Questioned by mahfuzdot, 17-Nov-2016
Q: Please reply.... Questioned by mahfuzdot, 19-Nov-2016
Sorry we cannot do that now as we said earlier. Answered by A.R, 20-Nov-2016 02:37 AM
Q: There is some thing I do not understand, I need only PWM pin from Arduino, but what will another pin, and I get some code from stack over flow, this codes are very friendly, and I want to use that codes,: CODES: intledPin = 3; void setup() { Serial.begin(9600); Serial.println("Serial connection started, waiting for instructions…n0 = Offn1 = 25%n2 =50%n3 = 75%n4 = 100%"); } void loop () { if (Serial.available()) { char ser = Serial.read(); //read serial as a character //NOTE because the serial is read as “char” and not “int”, the read value must be compared to character numbers //hence the quotes around the numbers in the case statement switch (ser) { case '0': analogWrite(ledPin, 0); break; case '1': analogWrite(ledPin, 64); break; case '2': analogWrite(ledPin, 128); break; case '3': analogWrite(ledPin, 192); break; case '4': analogWrite(ledPin, 255); break; default: Serial.println("Invalid entry"); } } } Questioned by asif.uz, 24-Nov-2016
Due to our company policy we cannot review any code. Hope you understand our policy. Sorry. Answered by A.R, 26-Nov-2016 11:15 AM
Dear sir, I can not understand why I use, pin nunber 2, can any you tell me. Thank You. Answered by asif.uz, 26-Nov-2016 11:30 AM
Q: Which Triac/Mosfet/Optocoupler Is Used For Dimming Purpose? Questioned by seyamico, 01-Jan-2017
Q: sob set kore program upload deyer por dimmer a ekta sound hocce.Ate kono problem hobe. Questioned by s.m.islam, 11-Mar-2017
কোন সমস্যা হবে না। ঐ শব্দটি স্নাবার সার্কিট থেকে আসছে ,যেটি মডিউলটিকে দীর্ঘস্থায়ী করতে সাহায্য করবে। Answered by techshopbd, 21-May-2017 16:53 PM
Q: দয়া করে কি , আপনি Blynk APPS সাপোর্টেড একটা কোড দিবেন, আমি অলরেডি ২টা কিনেছি, যদি আপনি এই রকম একটা কোড সেটাপ করে দিতে পারতেন, তাহলে আমি আরো ১০/১২টা কিনতাম, এই হোম সেটাপ টা আমাদের পরিচিত অনেকেই করতে চাইতেছে, তাই কোড টা দিলে ভালো হতো Questioned by falibuzzkonik, 21-May-2017
দুঃখিত বর্তমানে আপনাদের জন্য এমন কোন কোড দিতে পারছি না। Blynk এর জন্য আমার মনে হয় এই মডিউলটি ব্যাবহার করলে বেশি সুবিধা পেতেন... https://www.techshopbd.com/product-categories/modules-98775/2698/digital-ac-voltage-dimmer-techshop-bangladesh "Just pressing big yellow buttons you can increase and decrease input voltage. If you don’t want your hands dirty and prefer to press buttons "electronically" then hook an Arduino with it. Setting + pin to Low and – pin to High for at least 100 millisecond. Then you’ll have the ++ button pressed. Do the opposite to press - - button." Answered by techshopbd, 21-May-2017 17:14 PM
Q: This product does not work , It does not even power up Questioned by faisalbinfarooq, 12-Jun-2017
We sell our modules tested. So, if you are confident that there is no mistake from your side, please send it back with a copy of your invoice. We must check it first to give you a solution. But it is our humble request to check and double check before sending. Answered by A.R, 12-Jun-2017 10:07 AM
The power LED isn't lighting after connecting to _5v and GND. Is my module faulty? Answered by abushuvom, 12-Aug-2017 20:12 PM
Yes Same Here . Adriano does not detect the device Answered by faisalbinfarooq, 13-Aug-2017 21:40 PM
Hello Mr, Shuvom, Sorry for your inconvenience. That LED is not power LED. That's brightness LED. After Connecting 5V,GND, RLY, O-X and 220V AC and uploading proper code to arduino, that LED will light up with dimmed intensity. Try that. If that doesn't work feel free to comment here or come to our office. We'll have a chat. Answered by fahim08buet, 16-Aug-2017 11:00 AM
Mr. Faisal, Same goes for you. Follow the reply i've given to Mr. Shuvom. Answered by fahim08buet, 16-Aug-2017 11:02 AM
Q: is it compatible with raspberri pi ?? Questioned by robinabdullah, 27-Jul-2017
Yes but you have to program it by yourself. Answered by A.R, 27-Jul-2017 16:06 PM
Q: Although I can dim AC lamps with this module and the code provided, however, I can't control FAN speed with this. FAN rotates very slowly with whatever dimming value provided. Is anyone successfully tested controlling FAN with this? Questioned by abushuvom, 18-Aug-2017
We have tested this module on AC ceiling fans and it works fine. I added snubber circuit to it, just to make it work with inductive loads like "FAN". So it should work fine if you connect it properly. Answered by fahim08buet, 20-Aug-2017 11:17 AM
Q: Yeah it works fine with some tuning on the code. The dimming value range varies depending on the type of load. Thanks Questioned by abushuvom, 20-Aug-2017
Q: There are 4 pins in this module which are named GND, RLY, O-X, 5V I need to know the use of RLY pin and O-X pin. Questioned by robinabdullah, 20-Oct-2017
Q: can i use pwm signal for controlling fan speed ? Questioned by robinabdullah, 20-Oct-2017
O-X pin gives input to Arduino and depending on those inputs RLY pin turn on and off you load for very small time. O-X is for zero cross detection and RLY stands for relay. PWM won't work. We need interrupt. Proper way is to use the device is using the demo code. There's a demo code in "Documents" section (https://drive.google.com/file/d/0B3pZmaDwygPcT2E0SzlLc2Nnb0k/view). Open that example code and read commented lines at the beginning of the code. You'll find every instruction to run this device. Using the code above, you can control speed of AC fan. Answered by techshopbd, 22-Oct-2017 16:27 PM
Q: i need the code for raspberry pi. Questioned by robinabdullah, 22-Oct-2017
Sorry we do not supply code on demand. Answered by A.R, 24-Oct-2017 09:37 AM
Q: can i use it with esp8266 or NodeMCU? Questioned by rayhan.buet.eee.15, 13-Nov-2017
i got the same question Answered by k1ng4400, 30-Dec-2017 14:16 PM
Yes you can. But this device is designed to work with 5V unlike some ESP or Nodes. So take care of voltage conversion. Answered by fahim08buet, 31-Dec-2017 15:30 PM
Q: can it completely turn off the output power? Questioned by k1ng4400, 01-Jan-2018
Q: Will it work if I do not connect a relay on relay pin? Questioned by f4him123, 06-Jan-2018
Q: এটা কি ঠিক হলো। আমার আগের ভার্শনে ডিমারের সাথে হিট সিংক নেই । কিন্ত এখনের ভার্শনের সাথে দেওয়া হয়। এখন আমার টা কি চেঞ্জ করে দেওয়া হবে নাহ। কষ্ট পেলাম Questioned by falibuzzkonik, 11-Mar-2018
ভার্শন চেঞ্জের সাথে সাথে কিছু কিছু পরিবর্তন প্রোডাক্টে আসবে সেটাই স্বাভাবিক। এখন এটা চলছে পরবর্তীতে হয়তো আর এন্ড ডি টিম আরও কিছু পরিবর্তন আনবে। এটার বর্তমান ডিজাইনে শুধু হিট সিংকই যুক্ত হয়নি, ডিজাইনেও আরো কিছু পরিবর্তন এসেছে, দামটাও একটু বেড়েছে। এটা আমাদের অন্যান্য অনেক প্রডাক্টের ক্ষেত্রেই সত্যি। Answered by A.R, 12-Mar-2018 09:42 AM
Q: will it work with nodemcuu? 3.3 volt Questioned by k1ng4400, 13-Mar-2018
You have to use logic level converter in between. https://www.techshopbd.com/product-categories/modules-98775/2708/logic-level-converter-techshop-bangladesh Answered by A.R, 13-Mar-2018 09:42 AM
Q: Response Time is very High... OLED gone slow, IR not working... Ki jinish bhai eta? dimtime = 65 * dimming; // For 60Hz =>65 delayMicroseconds(dimtime + CORRECTION); // Wait till firing the TRIAC Reduce this [dimtime] otherwise It can work. Very Sad... Questioned by monzur0010, 25-Jun-2018
Our original code was: int dimtime = (95*dimming); // For 60Hz =>65 delayMicroseconds(dimtime+CORRECTION); // Wait till firing the TRIAC NOT 65 we used 95. We've tested this code numerous times, and it works perfectly. We used a macro called CORRECTION on the latest code. Sometimes the value of the resistors can be on the worst possible poles, which will affect the dimming code. So we enabled our user to tweak CORRECTION value and fine tune their device. Answered by fahim08buet, 26-Jun-2018 10:02 AM
Q: 95 use korle to aro beshi time lage but.. prb hosse OLED hang hoye jay... IR theke wrong value ase.. but only the device is working good... amar mone hoy na keu shudhu dimmer use korbe with Arduino... PIN to aro khali thake r IR sara Dimmer diye lav ki? jodi button e press korte hoy? So think about it... OLED te Level show korte hobe + IR diye jano Speed komano barano jay... keu nischoy Serial Monitor diye value diye FAN ba Light Dimming korbe na...? Questioned by monzur0010, 26-Jun-2018
জনাব মনজুর, আমাদের ওয়েবসাইটে সংযুক্ত কোডটি শুধুমাত্র একটি ডেমো কোড। যদি আপনি সত্যিকার অর্থেই অনেক গুলো ডিভাই কানেক্ট করতে চান যেগুলোর প্রতিনিয়ত রিফ্রেশ করতে হয় তাহলে ডিলে ব্যবহার করা যাবে না এটাই স্বাভাবিক, কারণ ডিলে দেয়া কালীন সময়ে মাইক্রোকন্ট্রোলার কোন কাজ না করে বসে থাকে। এক্ষেত্রে মাক্রোকন্ট্রোলারের টাইমার ফেচারগুলোকে ব্যবহার করতে হবে। তাছাড়া beginner দের জন্য আমি আরেকটি মড্যুল তৈরি করেছিঃ https://www.techshopbd.com/product-categories/modules-98775/2698/digital-ac-voltage-dimmer-techshop-bangladesh। এটার নিচে একটি ছোট্ট মাইক্রো কন্ট্রোলার আছে। এই মডুইলটির (+)/(-) পিনকে আপনি শুধু ১০০ মিলি সেকেন্ডের একটা LOW pulse দিলেই মডিউলটি আউটপুট ভোল্টেজ আপ/ডাউন করবে। Answered by techshopbd, 27-Jun-2018 09:44 AM
Q: ভাই একটা ভিডিও টিউটোরিয়াল দিলে ভালো হতো আপনাদের এই মডিউলের ব্যবহার বুঝতে ও কোড করায়। Questioned by Razib3242, 26-Jan-2021
প্রিয় গ্রাহক, আমরা চেষ্টা করবো। আপনি চাইলে আমাদের ওয়েবসাইটে লাইভ চ্যাটে টেকনিক্যাল টীমের সাথে সরাসরি যোগাযোগ করতে পারেন। Answered by almamun3248, 28-Jan-2021 12:07 PM
Q: কয়টা ডিভাইস কন্ট্রোল করা যাবে? Questioned by akshopdz@gmail.com, 09-Apr-2021
Single Device Control, You can also like "2 Channel Light Fan Dimmer Module" for one light and one Fan control. Link: https://techshopbd.com/detail/3426/2_Channel_Light_Fan_Dimmer_Module , You can also like "2 Channel AC Light Dimmer" for two light or two Fan control. Link: https://techshopbd.com/detail/3424/2_Channel_AC_Light_Dimmer Answered by almamun3248, 10-Apr-2021 14:52 PM
Q: Please code and user apps link Questioned by dsky196@gmail.com, 12-Feb-2022
Please check the document section under the product image. Answered by almamun3248, 14-Feb-2022 12:36 PM
Q: how many wat it can tolerate? Questioned by miltonche, 04-Jan-2023
Q: It possible to connect with ESP8266 node MCU WiFi module. Please share sample Coad for this module Questioned by rasel.mkr@gmail.com, 23-Mar-2024
Q: It possible to connect with ESP8266 node MCU WiFi module. Please share sample Coad for this module Questioned by rasel.mkr@gmail.com, 23-Mar-2024
Sorry sir, we don't do this Answered by Atiqur_ORELCO, 24-Mar-2024 08:47 AM
Q: stock available? when will be available? Questioned by msnoyonbhuiyan@yahoo.com, 24-Feb-2025
"This product has been retired and will not be restocked., you can check out our related products here: https://techshopbd.com/browse/search?term=Dimmer" Answered by TechShopBD, 25-Feb-2025 11:07 AM
Reviews & Ratings
0 Ratings / 0 Reviews
Recently Viewed
Help: 09678110110
09.00am - 08.00pm (7 days a week)
Pay cash on delivery
Pay cash at your doorstep
Service
All over Bangladesh
Warranty and Replacement
Up to 1 Year
.jpg)