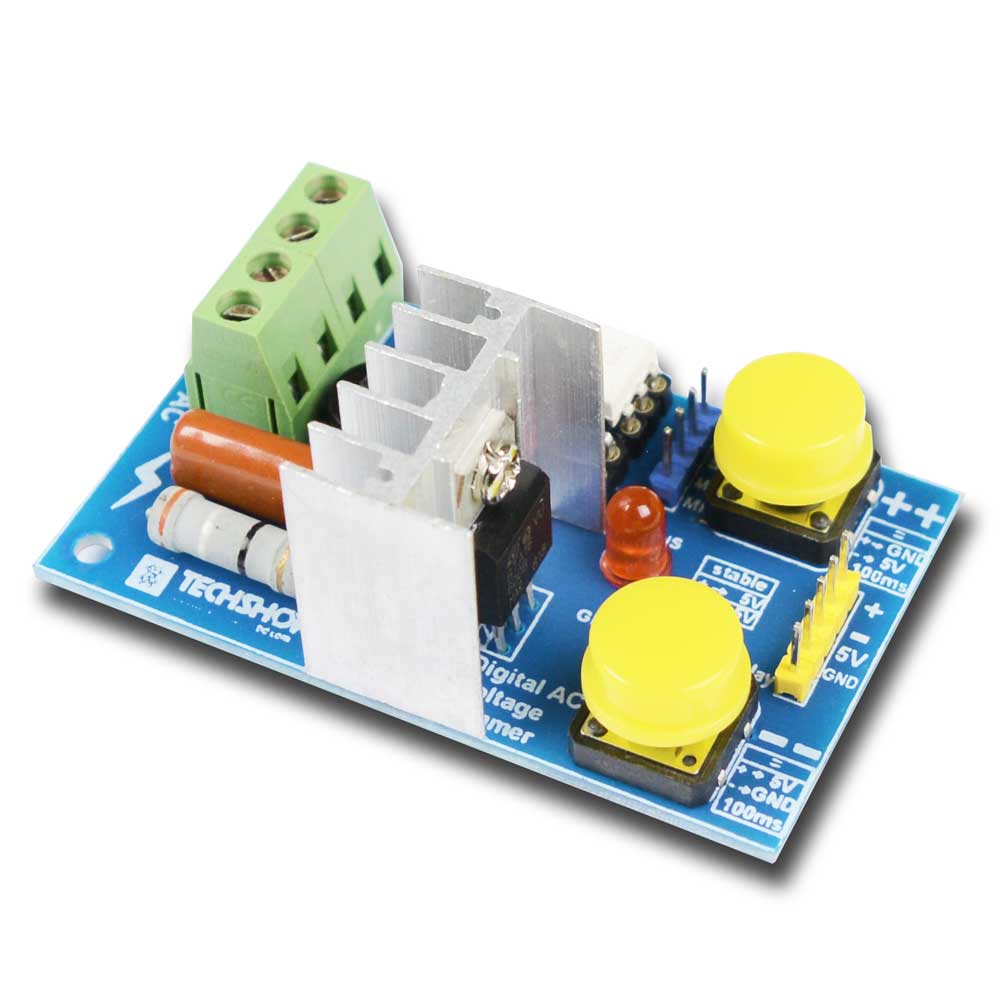
Summary Arduino compatible AC voltage dimmer with push buttons

Let’s say you dim a ceiling fan or incandescent light. You can do that with the help of “Programmable AC Voltage Dimmer” of techshopbd.com. But that module requires an Arduino and some advanced programming skills. What if you want to control voltage with just two push buttons? Or you don’t have advanced programming knowledge. Then this is the right module for you.


WHY YOU SHOULD USE IT?

It is very easy to control DC voltage with AnalogueWrite() function of Arduino . But household electrical equipment like ceiling fan, incandescent bulb, water pump etc. runs on 220 volt alternating current (AC). To control those equipment’s input voltage you’ll need this module and a 3.7-5.5V battery. That’s it.

Just pressing big yellow buttons you can increase and decrease input voltage. If you don’t want your hands dirty and prefer to press buttons electronically then hook an Arduino with it. Setting + pin to Low and – pin to High for at least 100 millisecond.  Then you’ll have the ++ button pressed. Do the opposite to press - - button.


NB: This device does not support CFL & Tube Light.

Question & Answer

Total 17 questions

Q: is it compatible with raspberry ?? Questioned by robinabdullah, 26-Jul-2017

Yes. Answered by A.R, 27-Jul-2017 16:05 PM

Q: এই মডুলে কি আরডুইনো ছাড়া বাটন প্রেস করে ফ্যান কমানো বাড়ানো যাবে? দয়া করে জানাবেন প্লিজ। Questioned by mahfuzdot, 08-Aug-2017

যাবে। Answered by A.R, 09-Aug-2017 10:15 AM

Q: I see a another rail with MOSI, MISO, SCk & RESET. Is that for SPI interface? It would be better if you provide some sample code for that interface. Also, I need to know how to problematically control it with Arduino like the model MOD-00120. Questioned by abushuvom, 16-Aug-2017

Hello Mr. shuvom, This module is the advanced version of "MOD-00120". For "MOD-00120"you'll have to connect a microcontroller(arduino) to it and write complex codes, but for this module there's a built in ATtiny13A microcontroller who is doing all the hard work for you. You just have to press ++/-- button. For controlling it with another Arduino/Microcontroller you can give a 100ms LOW pulse to +/- pins. For example: ++ button = (LOW to + pin) and (HIGH to - pin) - - button = (LOW to - pin) and (HIGH to + pin) Answered by fahim08buet, 17-Aug-2017 11:35 AM

And those MOSI, MISO, SCK pins are for that ATtiny13A microcontroller for production purpose. Users should NOT worry about that part. Answered by fahim08buet, 17-Aug-2017 11:37 AM

Q: এটা কি ফ্ৰিকুয়েন্সি কন্ট্ৰোল নাকি ভোল্টেজ কন্ট্ৰোল ? কত ওয়াট নিতে পাৱে । Questioned by Nanotechbd, 07-Oct-2017

এটা Phase angle controlled ডিমার। এই লিঙ্কে একটু দেখে নিবেনঃ https://en.wikipedia.org/wiki/Voltage_controller এটার সুইচিং এর জন্য BTA16 নামের একটি ট্রায়াক ব্যবহার করা হয়েছে। এই ট্রায়াকটির মধ্যে দিয়েই সকল কারেন্ট পাস করবে। এই ট্রায়াক এর কারেন্ট রেটিং ১৬ অ্যাম্পিয়ার। হিসেবে ৩৫২০ ওয়াট আসলেও আমরা রিকোমেন্ড করব ১০০০ ওয়াটের বেশি না যাওয়ার জন্য। বেশি ওয়াটেজে যেতে হলে হিট সিঙ্ক দিয়ে নিতে হবে। আমাদের সামনের ভার্শনে হিট সিঙ্ক থাকবে ইনশাল্লাহ। Answered by techshopbd, 08-Oct-2017 12:15 PM

Q: এটা Phase angle controlled ডিমার। এই লিঙ্কে একটু দেখে নিবেনঃ https://en.wikipedia.org/wiki/Voltage_controller এটার সুইচিং এর জন্য BTA16 নামের একটি ট্রায়াক ব্যবহার করা হয়েছে। এই ট্রায়াকটির মধ্যে দিয়েই সকল কারেন্ট পাস করবে। এই ট্রায়াক এর কারেন্ট রেটিং ১৬ অ্যাম্পিয়ার। হিসেবে ৩৫২০ ওয়াট আসলেও আমরা রিকোমেন্ড করব ১০০০ ওয়াটের বেশি না যাওয়ার জন্য। বেশি ওয়াটেজে যেতে হলে হিট সিঙ্ক দিয়ে নিতে হবে। আমাদের সামনের ভার্শনে হিট সিঙ্ক থাকবে ইনশাল্লাহ। Questioned by techshopbd, 08-Oct-2017

Q: detail e working procedure ta ki daoa jabe, bcz ami ekta purchase korc bt bt fan er speed controll korte partc na. here is the part of my code. case code7: digitalWrite(output7,HIGH); digitalWrite(output8,LOW); delay(1000); digitalWrite(output7,LOW); digitalWrite(output8,LOW); break; case code8: digitalWrite(output7,LOW); digitalWrite(output8,HIGH); delay(1000); digitalWrite(output7,LOW); digitalWrite(output8,LOW); break; Questioned by Fahimshahriar, 28-Dec-2017

Here's the general working principle: Set + pin to Low and – pin to High for 100 milliseconds = Fan speeds up Set + pin to High and – pin to Low for 100 milliseconds = Fan speeds down Set + pin to High and – pin to High for 100 milliseconds = Fan speed stable Set + pin to Low and – pin to Low for 100 milliseconds = Error, avoid this case. Answered by fahim08buet, 31-Dec-2017 10:15 AM

Q: ভাই এটার কি Schematic পাওয়া যাবে? Questioned by mahfuzdot, 06-Mar-2018

No. Answered by A.R, 07-Mar-2018 09:20 AM

আর যদি তা না হয় তাহলে এটার সাথে ২ টি রিলে যোগ করে একটি মডুল বানিয়ে দিন। মানে আমি চাচ্ছি দুইটি লাইট ও একটি ফ্যান এক মডুল থেকে কনট্রোল করতে আলাদা আলাদা মডুলে অনেক ঝামেলা হয়। আমি অনেক পিস নিব... Answered by mahfuzdot, 07-Mar-2018 10:13 AM

Q: আপানার যেহেতু এই মডুল গুলো কাস্টমভাবে তৈরী করেন তাই বল্লাম আমার এই ডিমার আর দুইটি রিলে সুইচের একসাথে এক পিসিবি বোর্ডের মডুল লাগবে। Questioned by mahfuzdot, 07-Mar-2018

দুঃখিত, আপনার কাছে সম্ভবত ইনফরমেশন গ্যাপ আছে। আমরা ক্রেতার চাহিদা অনুযায়ী কাস্টমাইজড কোনো মডিউল বানিয়ে বিক্রী করি না। বিষয়টি আমাদের টেকনিক্যাল পলিসিতে উল্লেখ করা আছে। https://www.techshopbd.com/product-categories/wifi/2832/esp8266-wifi-2-relay-switch-techshop-bangladesh Answered by A.R, 07-Mar-2018 17:24 PM

Q: Please provide better documentation, connection diagram and fix the "arduino tutorial" link. Questioned by saaakib, 09-Dec-2018

Q: এটা কি google assistance support kore? Questioned by Lipugf, 02-May-2021

দূঃক্ষিত স্যার। এটি Google Assistance সাপোর্ট করে না। তবে আপনি ইচ্ছা করলে "ESP8266 Development Board" এর সাথে "Digital AC Voltage Dimmer" ব্যবহার করে, খুব সহজেই এটি দিয়ে IOT Device তৈরী করে নিতে পারেন। এতে করে আপনি Google Assistance ব্যবহার করে ডিভাইসটিকে নিয়ন্ত্রন করার সুবিধা পেতে পারেন। Answered by FAHIM_REAZA, 03-May-2021 11:42 AM

Q: Blink e connect kora jabe? Questioned by Lipugf, 02-May-2021

Blynk কানেক্ট হতে এমন একটি ডিভাইসের প্রয়োজন, যার মাধ্যমে ইন্টারনেট access করা যায়। তাই এক্ষেত্রে আপনাকে "ESP8266 Development Board" এর সাহায্য নিতে হবে। (অনুগ্রহ করে Summary এবং Documents ট্যাবের information গুলো সময় নিয়ে পড়ুন। এতে করে "Digital AC Voltage Dimmer") সম্পর্কে আপনার ধারণা পরিষ্কার হবে।) Answered by FAHIM_REAZA, 03-May-2021 11:54 AM

Q: ভোল্টেজ কন্ট্রোল রেঞ্জ কতো ? অর্থাৎ সর্বনিম্ন ও সর্বচ্চো কতো ভোল্ট অউটপুট দিতে পারে ? Questioned by seepolash, 10-Mar-2022

ইনপুট সিংগেল ফেজ (২২০ ভোল্ট)। আউটপুট ০-২২০ ভোল্ট। Answered by almamun3248, 16-Mar-2022 14:34 PM

Q: Can it retain the state of dimming if the power goes out? Questioned by nahyan, 11-Apr-2022

No, it can't. Answered by almamun3248, 12-Apr-2022 08:48 AM

Q: Can I connect the "5V" pin of this module with a digital output pin of arduino UNO? As arduino UNO supports max 20 mA from output pin, will the device consume higher current from arduino? Please give a separate schematic when i want to control fan speed by arduino. Questioned by naimhossen, 11-May-2022

Q: Can I connect the "5V" pin of this module with a digital output pin of arduino UNO? As arduino UNO supports max 20 mA from output pin, will the device consume higher current from arduino? Please give a separate schematic when i want to control fan speed by arduino. Questioned by naimhossen, 11-May-2022

Q: // 5V, GND pin of module connected to 5V, GND pin of arduino UNO, int relay = 2; // digital pin 2 is connected with relay pin of the module int plus = 8; // digital pin 8 is connected with pin of the module int minus = 7; // digital pin 7 is connected with - pin of the module void setup() { Serial.begin(9600); pinMode(relay, INPUT); pinMode(plus, OUTPUT); pinMode(minus, OUTPUT); } void loop() { int relayState = digitalRead(relay); Serial.println(relayState); digitalWrite(plus, HIGH); digitalWrite(minus, LOW); delay(100); digitalWrite(plus, HIGH); digitalWrite(minus, HIGH); delay(100); } This code doesn't decrease the voltage. Output always remains same as input voltage (240V) Questioned by naimhossen, 11-May-2022

Q: rfgsd Questioned by tuuce.suberk@gmail.com, 11-Sep-2023

Reviews & Ratings

0 Ratings / 0 Reviews

[0]

[0]

[0]

[0]

[0]

icon

Help: 09678110110

09.00am - 08.00pm (7 days a week)

icon

Pay cash on delivery

Pay cash at your doorstep

icon

Service

All over Bangladesh

icon

Warranty and Replacement

Up to 1 Year